New, Modern Yurt Build In Mongolia |
 |
|
 09-17-2022, 02:02 AM
|
#1
|
|
Yurt Forum Addict
Join Date: Mar 2022
Location: Ulaanbaatar, Mongolia
Posts: 118
|
 Re: New, modern yurt build in Mongolia
Lots of new work has been going on in the last week or so. Some of it quite scary.
The law in Mongolia states we must have septic tank(s) for toilets etc. I talked to my trusty handyman who I've been hiring for years. He designed a system that wasn't too expensive but would NOT need emptying often. With 2 people it might be years before the system needs emptying. So this is what he did.
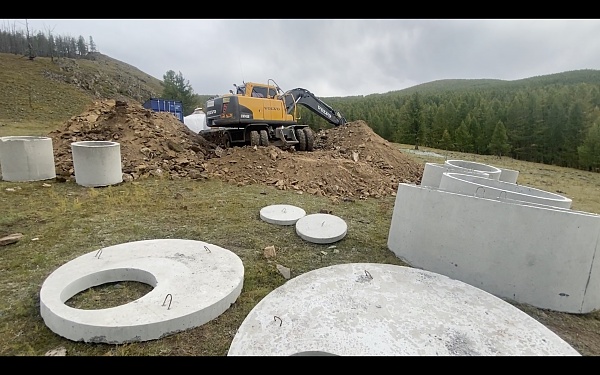
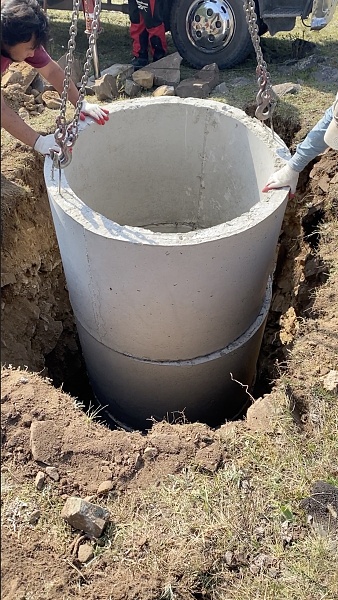
A black water septic tank 2.5m diameter and 3m tall. This is fully enclosed and will need to be pumped out every time we fill it. However, it's just for the toilet only.
A grey water septic tank 1.5m diameter and 3m tall. This has no bottom and simply holds water while it drains into the soil. This is for sinks, washing machine, bath, etc.
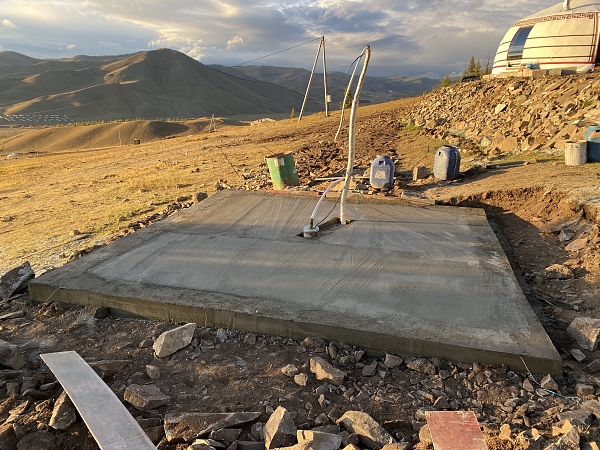
A narrow but deep trench to the well for water supply. A big hole for the 2 septic tanks (3.8m deep). And a trench from the septic tank to the spot where our bathroom will go.
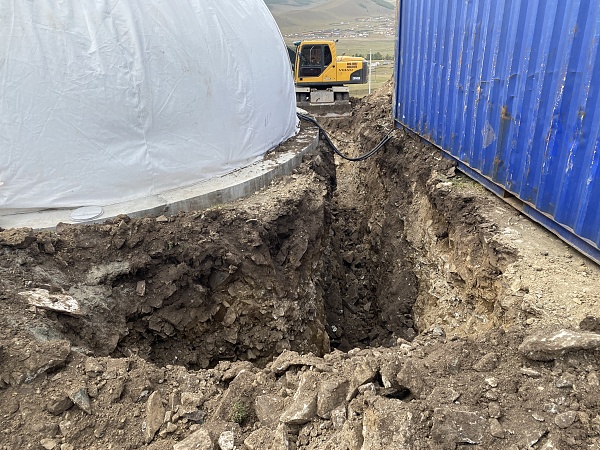
Precarious looking trench between gers and containers.
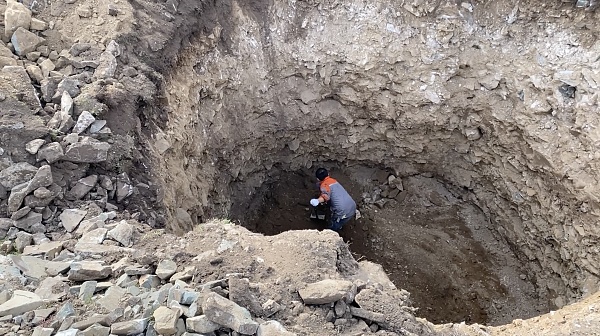
My man Paul preparing the bottom of the pit.
This required 3.5 days of excavator work. The operator was brilliant and I was impressed with his skills. In hindsight, we should've done this excavation BEFORE we built the gers but, hey ho, we didn't.
I was worried about the trench collapsing too and somebody getting hurt. Mongolians generally do not taken seriously. OSHA would have a fit. Luckily, no accidents happened.
Here are the parts before assembly.
We coated the concrete on the outside with tar for increased longevity. Each section/ring was sealed with PU foam. Finished and ready for burial, it looked like this:
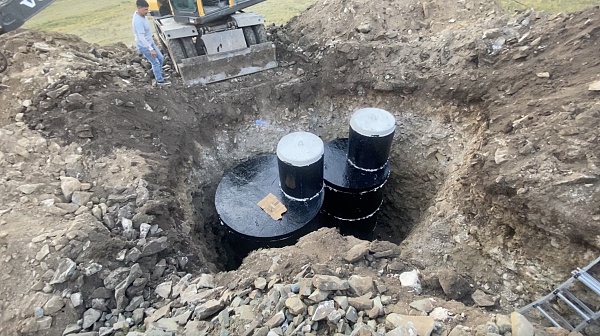
After burial (with notes):
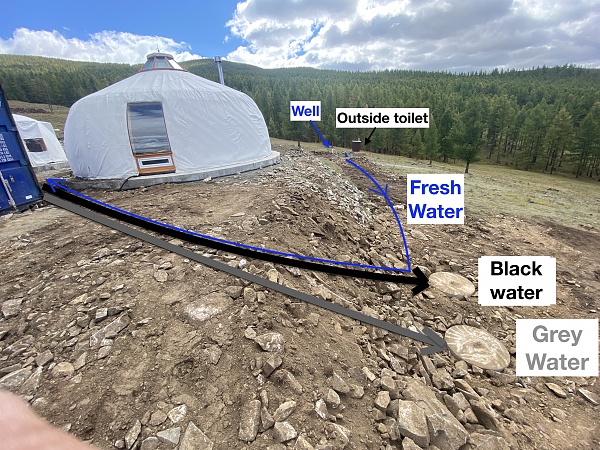
All pipes are insulated and heated (in the 7 freezing months).
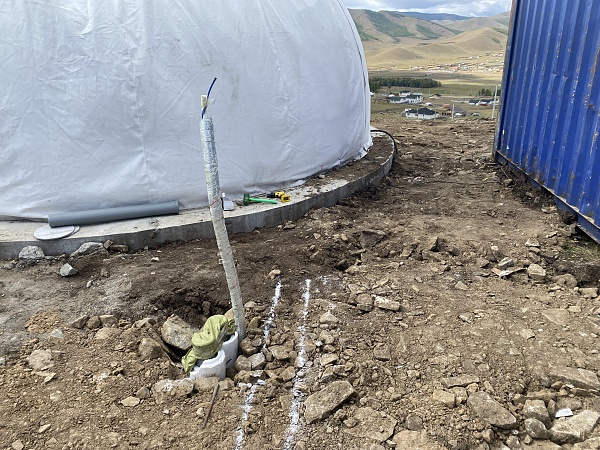
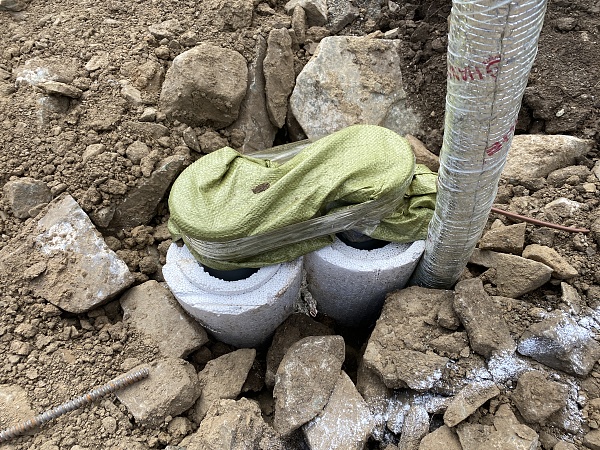
Now we can proceed with a foundation for the bathroom. Keen observers may note the of the drain pipes. It's EPS and all joints/seams are further insulated liberally with PU spray foam. Underground there is even more (fiber glass AND/OR foam blankets). In addition, there is a heated wire in each pipe wrapped around to keep it from sub-freezing in the cold months (October to April). There might be a thermostat too.
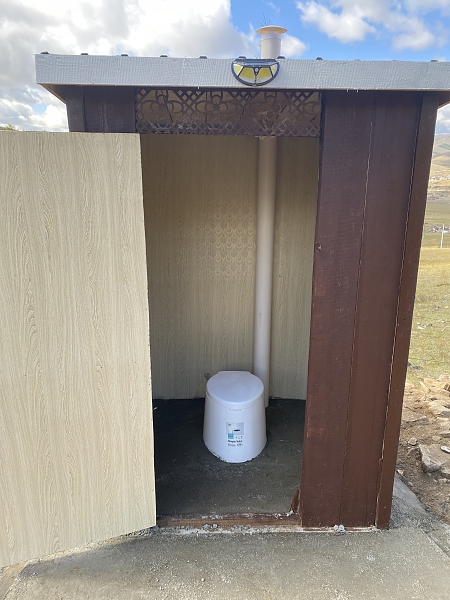
Since we STILL don't have an indoor bathroom, we had an outdoor toilet which also has a septic tank (1m diameter x 3m deep). It's basic but it's better than what we had before - squat over a trench which is now full. Ah, the luxury.
I wasn't impressed with this company's attention to detail. No tar coating, no foam in the seams of the rings in the septic tank. Also, the toilet structure wasn't well made. The roofing in particular is shoddy work (no drip edge). I could complain or fix myself.
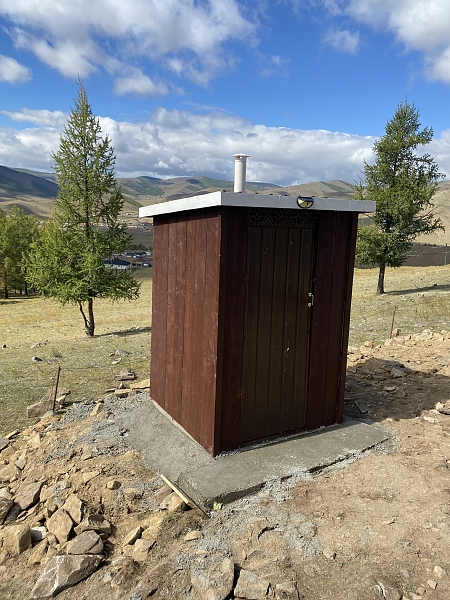
In any case, it'll do the trick and it will take 2 people years to fill up.
Last edited by UKadventurer; 09-17-2022 at 02:13 AM.
Reason: bad links
|

|

|
|
09-17-2022, 08:52 AM
|
#2
|
|
Yurt Forum Addict
Join Date: Nov 2013
Posts: 2,210
|
Re: New, modern yurt build in Mongolia
That's some solid ground. Hardly any taper to the hole. He knew it was safe. Good work.
Well done U.K. I really appreciate the detailed photos. Thanks man.
|
|
|
|
|
09-21-2022, 07:46 AM
|
#3
|
|
Yurt Forum Addict
Join Date: Mar 2022
Location: Ulaanbaatar, Mongolia
Posts: 118
|
Re: New, modern yurt build in Mongolia
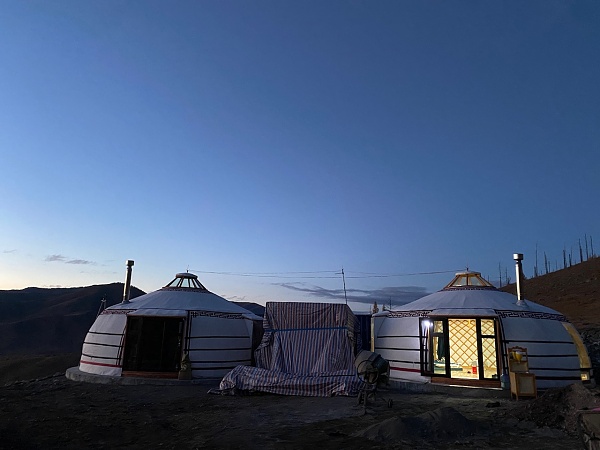
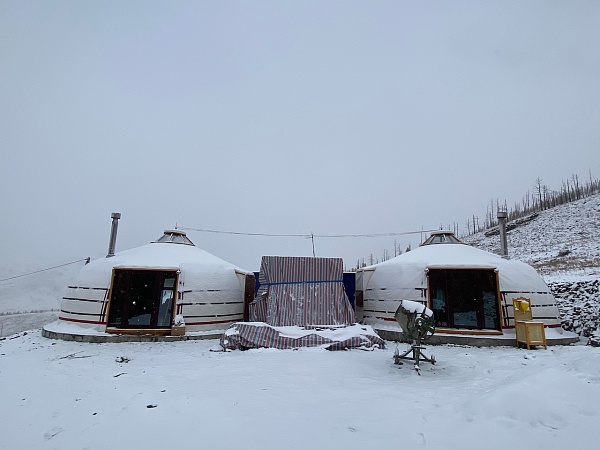
The ger company finally brought our outer covers, straps and trim. I'm very pleasantly surprised. The gers look totally different and pretty cool, I think. Much more traditional look but with the curved walls. Better than I expected.
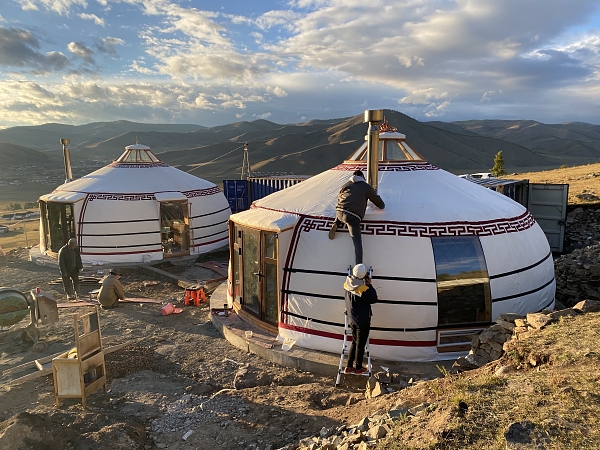
Another angle.
Also, the well house foundation is done. My handyman is going to build the well house in his workshop and truck it up here. It'll be much smaller than the foundation (4m x 4m square) because it needs to be heated in the freezing months and kept above freezing. Probably 1.5m W x 2m L x 1.5 H. So it'll be just big enough to fit a 1000L cold water tank, pump and other gear needed to supply our bathroom and kitchen. Also big enough for a human to service the equipment. We'll have a hot water tank of much smaller capacity in the bathroom.
With freezing nights already we need to step up the pace of getting our bathroom/hallway and water supply done. Those unfinished side door frames are chilly spots these days.
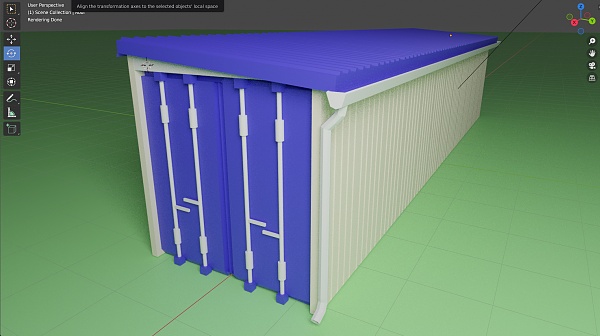
I also need to insulate the containers. I'm rethinking my design and considering using steel sandwich panels (15cm EPS core) for the bathroom and containers due to their wide availability (they are made locally), their speed of construction and they are cost effective here. They cost 1/3 the price of the same items in the UK.
I did a 3d rendering of the back to back 20 ton containers we have with sandwich panel walls and roof. They won't win any awards but they'd look better than the current ghetto appearance, I think. I compared the price of sandwich panels (exterior) to PU spray foam (interior) and the price per m/2 was the same. Spray foam would be quicker but lose a bit of interior space and do nothing for the aesthetics of somewhat beaten of shipping containers. I haven't decided yet which way to go. I'll almost certainly use sandwich panels for the bathroom so my experience with that my sway me one way or another.
Any thoughts?
|
|
|
|
|
09-21-2022, 10:05 AM
|
#4
|
|
Yurt Forum Addict
Join Date: Nov 2013
Posts: 2,210
|
Re: New, modern yurt build in Mongolia
My first comment is no exposed spray foam that could be ignited from lightning strike, torch, light bulb breakage, electrical short, welding sparks, grinding sparks, or act of God. The fumes from burning foam will kill you in short order and that's to be respected. No bs. Residential spray foam here in the U.S. Is ALWAYS covered for that reason. Yes, it's incredibly good insulation, and incredibly good at killing occupants if ignited.
I'd opt for the more affordable panels that are made locally.
Yurts are mucho niceo. Thanks again for a great thread!
|
|
|
|
|
09-21-2022, 09:01 PM
|
#5
|
|
Yurt Forum Addict
Join Date: Mar 2022
Location: Ulaanbaatar, Mongolia
Posts: 118
|
Re: New, modern yurt build in Mongolia
Quote:
Originally Posted by Bob Rowlands

My first comment is no exposed spray foam that could be ignited from lightning strike, torch, light bulb breakage, electrical short, welding sparks, grinding sparks, or act of God. The fumes from burning foam will kill you in short order and that's to be respected. No bs. Residential spray foam here in the U.S. Is ALWAYS covered for that reason. Yes, it's incredibly good insulation, and incredibly good at killing occupants if ignited.
I'd opt for the more affordable panels that are made locally.
Yurts are mucho niceo. Thanks again for a great thread!
|
Great points. We use the containers as a garage, workshop and storage. The attraction of PU spray foam was that I didnt think I needed to add a finished interior (dry wall). Since I was wrong about that, I agree that steel sandwich panel is the way to go. Itll take longer but be a much more satisfactory solution.
The cost of steel sandwich panels (15cm / 6 thickness) is about $17 per m/2 which is the same as spray foam of 5cm (2) thickness per m/2.
Winter like conditions comes early here. We had a blizzard last night.
However, the snow will melt soon. Its still well above freezing and sunny in the day.
|
|
|
|
|
09-22-2022, 10:29 AM
|
#6
|
|
Yurt Forum Addict
Join Date: Nov 2013
Posts: 2,210
|
Re: New, modern yurt build in Mongolia
Nice photos. Thanks. No doubt about it, this is one of THE best illustrated/detailed threads ever on this site and I've been here a long time.
Fall is starting and and I'm diggin' it.
|
|
|
|
|
09-22-2022, 08:52 PM
|
#7
|
|
Yurt Forum Addict
Join Date: Mar 2022
Location: Ulaanbaatar, Mongolia
Posts: 118
|
Re: New, modern yurt build in Mongolia
Quote:
Originally Posted by Bob Rowlands
Nice photos. Thanks. No doubt about it, this is one of THE best illustrated/detailed threads ever on this site and I've been here a long time.
Fall is starting and and I'm diggin' it.
|
Thanks so much. That means a lot to me. Im collecting video too. Im hoping to make YouTube videos again, documenting our build out, but our upload speeds are terrible. Hopefully Starlink will help with that, if/when we get government approval.
Autumn lasts about 2 weeks here. Its very pretty to see the forest change. One thing thats not great is Siberian larch (the majority of trees next to us) goes yellow and drops all its needles. Not so pretty. Hopefully well plant some pine trees in the future which keep their needles and are evergreens. Theyd need to be the extreme cold tolerant type.
|
|
|
|
|
09-23-2022, 08:52 AM
|
#8
|
|
Yurt Forum Addict
Join Date: Nov 2013
Posts: 2,210
|
Re: New, modern yurt build in Mongolia
Thank you Sir.
Last edited by Bob Rowlands; 09-23-2022 at 08:58 AM.
|
|
|
|
|
10-03-2022, 08:47 AM
|
#9
|
|
Yurt Forum Addict
Join Date: Mar 2022
Location: Ulaanbaatar, Mongolia
Posts: 118
|
Re: New, modern yurt build in Mongolia
A little update for the 2 people following this thread. 
I might have mentioned before that I'd had lumbar spine surgery in late May. Well, I re-herniated my disc (or herniated a different disc) a few weeks ago, which limited my abilities (again) but I'm feeling well enough to do some physical work again. I faithfully wear my back brace all day now.
So, I'm not just the architect any more but also the builder. My tool set is not a patch on what I used to have in the USA but one must make do. I've got a few drills (lightweight mains and battery plus a hefty hammer drill for concrete work) and just one basic circular saw at the moment. I'm tempted to add a power miter saw, a belt sander, a planer, and a jig saw. I'll probably need them for interior work (shelves, bed, kitchen counters, etc).

The other reason for doing it myself is the fast approaching freezing temperatures. Also, I did not think it would be especially physical work. Hah! I was wrong about that. 4 metre long lumber 10cm x 10cm (4"x4") green lumber can be quite heavy and I'm not supposed to lift more than 10kg, according to my doctor. I'm a bad patient.
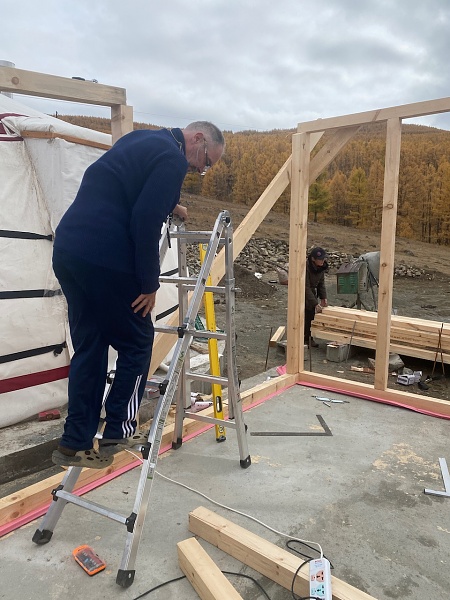
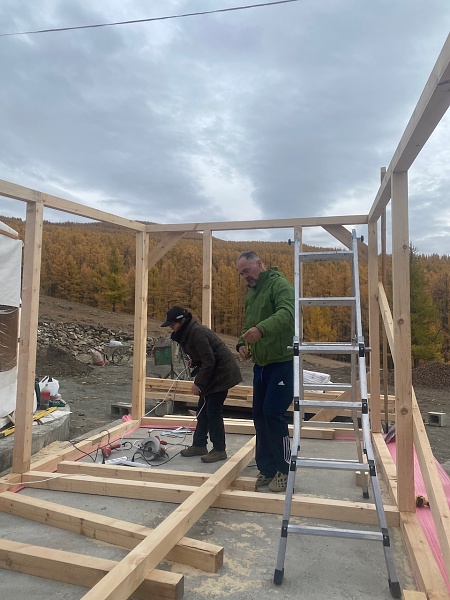
Following the style of the gers (10cm square post and beams with wide spacing), I'm continuing that style in the bathroom. The frame is mostly up with some additional 45 degree bracing to be added in the corners. Photos show temporary bracing with 5cm x 15cm rough cut lumber. Final braces (knee?) will be 10cm x 10cm smooth planed 4-sides. Also the exterior and interior doors still need to be framed. The 15cm thick wall and roof steel sandwich panels are coming on Thursday and I'm hoping to have helpers to install them. Otherwise it'll just be me and the wife which isn't appealing. My mother in law is the lady in the photos. She's been amazing, coming up to the camp every weekend and building rocks retaining walls and helping with any and all construction. She has no experience with any of it but she follows directions and never grumbles. That being said, she grew up in the countryside so she's no stranger to hard work. Now she has an office job, retiring next year, so perhaps she relishes the physical work for a change.
I'm particularly impressed with her rock work, although she got advice from her son, my brother-in-law. Unfortunately, they can only work weekends. He comes less often. I wish I had them full-time.
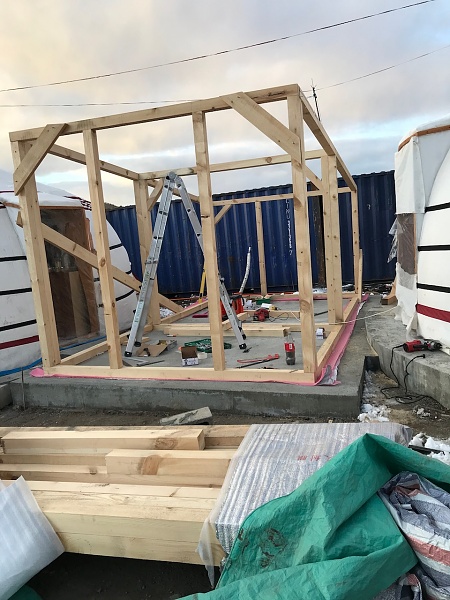
This is where I'm up to now. There was a cold snap though and I couldn't get much done with my limited tools and the very cold weather. I measured -26C (-15F) this morning and it never got above freezing. There was a nasty northerly wind all day too. So, we hastily added several mylar backed foam layers to the side door openings because this cold snap is expected to last 4 days and nights.
The night before the snow we put up a tarp on the framework, just because I thought it was a good idea.
There was a bit of snow, maybe 10cm (4") in the morning. We continued working on Sunday, since it wasn't that cold .... yet.
Today was too cold for me to get much done. The snow stuck around on our slope.
This captures the temperature and the nice rock work, in my opinion. You can even see the loose rock about 50 metres away on the mountain. It's free for the taking, within reason. There's many tons of it, so we barely scratched the surface of the loose rock that is available to us.
Finally, we adopted ANOTHER cat. A stray that has been coming to camp for several months and living rough in the mountains. It was incredibly shy and nervous but now lives with us. We have 3 rescued cats now.
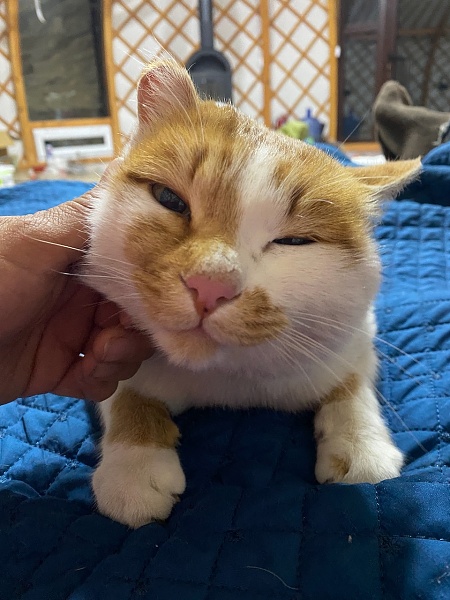
I call him Ginger, for obvious reasons.
Last edited by UKadventurer; 10-03-2022 at 08:58 AM.
Reason: clarification
|
|
|
|
|
10-03-2022, 09:39 AM
|
#10
|
|
Yurt Forum Addict
Join Date: Jul 2018
Location: Austria
Posts: 244
|
 Re: New, modern yurt build in Mongolia
Quote:
Originally Posted by UKadventurer
A little update for the 2 people following this thread. |

You´re right, it´s a little bit lame, but it seems worldwide the only serious place where Yurt discussions are running over longer times and on more than one single topic.....  Thanks for sharing
 and keeping @Bob & me updated.
Wish all the best with your health, quick recovery & progress with the work.
Quote:
Originally Posted by UKadventurer
I call him Ginger, for obvious reasons.
|
Why not "Genghis"/"Chinggis"? 
|
|
|
|
|
|
 Posting Rules
|
You may not post new threads
You may not post replies
You may not post attachments
You may not edit your posts
HTML code is Off
|
|
|
|
|


 Hybrid Mode