Ad

The End of the World

Dan R-M

New member
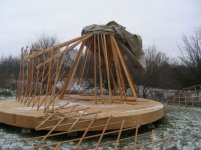
Well, for our yurt, at least. In the strong winds last night (which didn't seem as strong as previous winds) part of it collapsed. Well, all of it I guess, but a quarter to a third of the wall bent in and down.
Bad timing, though it could have been worse. We could have been living in it.
I have a lot of emotions about it right now, not the least of which is some severe frustration with the extent to which I tried to make right a Spirit Mountain yurt. It has bitten my rear end for the last time.
Not having ever read any accounts from others experiencing structural yurt failure, I'm not prepared to give up on yurts. I'm ready to build my own, but I have a hurdle to get over first: what is it about SM yurts that sucks? My speculation is that the roof is too steep or that the rafters don't join the center ring in a sturdy enough fashion. Or that they really just don't give a damn about anything (besides money), and their yurts somehow manifest that.
And, of course, I need some plans I feel like I can depend on. So I would love to hear words of support and encouragement, and some advice about 1) what could have gone wrong and 2) how to build my own that doesn't fail.
I discovered this an hour before we were going to head four hours north to my in-laws' for X-mas, so now I'm trying to figure out how much needs to be done to clean up the mess...
Photos, of course, will follow.
 
Dan,

So sorry for this! Geesh, the Mayans were right, for your Spirit Mountain Yurt anyway. That is just horrible; after all the work you put into fixing all the issues with it!

Do you think you might want to purchase a new yurt from a better company like Colorado Yurts or Pacific Yurts? I know both of those companies are having sales right now (CYC & PY). Or are you looking to start from scratch? Some of our other traditional yurt manufacturers might be able to chime in here if that is the case.
 
Some of our other traditional yurt manufacturers might be able to chime in here if that is the case.

Sorry that the world did get to an end somewhere. Sure, if you where going to build a more traditional design, we could help with spare parts.
Wishing you nevertheless Happy Holidays and a better 2013 yurt year :)
 
:( So sorry to hear, Dan. Spirit Mountain is a prime example of people that get the great idea to try to build a yurt, have some success with it, and then fly off and out of the safe zone in order to capitalize on the idea WAY before they are ready to do so. Unfortunately there are several of these types out there, which is not cool because they give yurts a horrible reputation with people who don't know any better. Now they've gotten too big to fix the seriously flawed nuts and bolts of their product and operation without shutting down the doors completely for a good length of time. All you can do is share your experience and keep moving forward, so thank you for continuing!

I wish your first yurt experience could have been with an outstanding product. Then again, you've learned things many other yurt owners haven't! We had a similar experience when we first started our company, so I can *very much* relate to your frustration.

If you are completely sure you want to build your own and not take it easy on yourself with an excellent and tested yurt from one of the top companies, (backed with excellent warranties too!), then give Hal a call from Laurel Nest Yurts. He sells a book with plans for a hand made yurt. You will be facing many challenges to get it top notch, but you have some experience now!

Comprehensive Yurt Building Manual | Laurel Nest Yurts
 
I second Hawaii Yurts suggestion to contact Hal. In addition to the yurt construction plans, he also hosts yurt building workshops where you will actually apply his process and build a yurt while you learn about all of the parts and their functions.
 
Jeepers Dan, That Stinks. There is hope.

Hey Dan-o,

Looking at the structural photos from the spirit mountain yurt shows me a few major architectural flaws right off the bat. That doesn't mean that some of the parts that you have from that yurt cannot be retro-fitted to create a sound structure.

The emotional invocations that the original parts cause, may be justification enough to toss the whole mess onto the burn pile. But, if you give it a bit of time I'm thinking we can help you to create a super solid new yurt that makes use of the materials you already have on site. With some design modifications that spirit mountain turd can become the Phoenix yurt of Ohio!

Where this is a will there is a way.

-All the Best!
 
Here are a few choice images, now that the event is more than a week behind me. For those with more experience these might show something obvious that I'm missing. And they are certainly gruesome and sensational, in yurt terms, so that alone is a good reason to post them :)DSCN4306.jpg
The collapse happened on the side where the prevailing winds blow.

DSCN4307.jpg

DSCN4310.jpg
This one shows the lathe splitting all along one diagonal. This happened on the other side of the collapse, too, but it's hidden by the roof.

DSCN4315.jpg
Luckily the wall fabric and windows were undamaged. The roof was no worse damaged than before, which is to say it will probably be great scrap vinyl. Btw, thanks Steve for the vinyl. I hadn't quite put it on yet. It will be a lot easier now that I don't have to climb up to get to the roof :)
 
Last edited:
This is heartbreaking. Let me ask you: did you have any blocking between the rafters? It doesn't look like it, but thought I would ask anyway. This is just horrible. Thank goodness you were not inside!
 
Center Ring to Rafter Hardware Failure.

I suspect the hardware used to join the center ring to the rafters failed. Also, for this diameter yurt it looks as if the roof pitch is too steep. This is a 18 ft. diameter yurt, correct?

You're roof pitch should be somewhere near a 6-12. This looks much steeper, perhaps 10 - 12. This is speculation of course from the photos.

The lattice wall can easily be fixed, really, it is super easy to replace those broken slats.

The roof pitch can be brought down by shortenting the rafters and re-notching them in the appropriatte place. Or just re-nothcing them and leaving the remainder for an over -hang to keep snow and rain away from the wall. With the overhang you could add a fabric sophet piece underneath to seal up the draft and keep out bugs.

The metal bracket hardware used is good as an additional bracer but there should be steel dowels in the center of the rafters that fit into holes drilled into the center ring. Those 'L' brackets are not meant to support that type of downward force at all.

It really looks terrible from the pictures. Honestly, in the spring when you pick everything up it should be pretty inexpensive to fix all of these design flaws. Considering your constuction experience & all of the work you have already done to repair this yurt, I am confident you could do all of this work yourself, with the help of friends... (&/or perhaps your father-in-law). He's the carpenter right?

God Bless Dan! & Have a happy new year with the new little one!
 
The one thing i took note of is the wall slats look a bit small and i would think there would be alot more of them. I have some yurt plans i collected off the internet and would share with anyone wishing to see them free of charge of course.just drop me an e-mail and ill send them right out.
 
Dan R-M,
Sorry for your hardship. Don't let one bad experience stop you from moving onward and upward. Yurts are great. Overall I think they do very well in the wind. Lessons learned will help you and others to improve on old designs and the new ones to come.

The one thing i took note of is the wall slats look a bit small and i would think there would be alot more of them.

I agree with the under size lattice and that there should be more of them. I use 160 - 3/4" X 1-1/2" X 6' on a 20' yurt wall.

We had a severe wind storm December of 2011 with winds of 100 mph. This happened while I was out of town and not able to tend to my yurts or see first hand exactly how they reacted to this kind of wind. It blew down a lot of trees and my yurt stood up to the torture. However I did learn a few things.

It is critically important to have solid connections at the rafter to the the hub and rafter to walls. The top and side canvas must also be securely fastened. The wind pressure causes the canvas to inflate and deflate rapidly as I have learned during lesser wind storms.

Now if a tree like the ones shown in the photo below came down on top of you then all bets are off.


Quote from our local paper
"Strong wind gusts of up to 100 mph that whipped through the Sierra on Thursday, December 1st left a swath of damage in their wake. Three separate fires burned about 250 acres before being contained December 2nd – downed trees, power outages and serious damage to numerous homes were a result of the intense wind gusts.

Much of the damage was concentrated in the small foothill community of Twain Harte, CA where homes are built around Pines, Cedars and Oak Trees. The trees are continuously trimmed and unhealthy trees are quickly removed, the unusually strong wind gusts uprooted healthy trees causing them to fall on structures around them."

file.php
 
Last edited:
Thanks for the specs you note! There are a few things I know I'd do on a new one - bevel the center ring to butt directly against the rafter ends, and use some kind of bracket to mate the rafter end into (instead of the simpson that I doubt was designed to be used that way).
And thanks for the encouragement! The replacement yurt is on the backburner for now, with home repair ahead of it. I will post the great platform-cover I've put on in the meantime, though...
 
Only in my dreams, right now, unfortunately. The yurt was going to be the fastest way to get over to our garden site to live in a seasonal way until we got the run-down house fixed back up again.
We're switching the priorities of the two now, however, so it'll be a bit yet before we pick the yurt again. It looks like the forum is picking up major steam!
 
Completely understandable. Well good luck with the house! Hopefully that is a better experience. :)
 
Dan I wish we were closer I would be more than happy to help with your yurt. Im sorta old fashion where you help your neighbor every chance you get and he does the same for you. for instance my neighbors built my cabin while I was putting plumbing in another neighbors cabin.
 
Wait, did I read that right?

The rafters were affixed to the roof ring with simpson brackets?
 
And screws, yes. Thoughts, bss?
I think, myself, that they alone were not the reason for failure. In fact, they held the rafters to the center ring throughout - even as I was trying to push the whole thing over. It looked like something out of War of the Worlds. Maybe a female alien, with a lovely head of vinyl hair. This deserves a photo...

BUT, I think it goes without saying that there are better ways to join rafters to rings.
 

Attachments

  • yurt trying to fall.jpg
    yurt trying to fall.jpg
    97.5 KB · Views: 1,473
Wow what a mess I set up one of my yurts one winter with no wall covering at all just for the heck of it and to see if I could come up with a way to make it stay put. I had the cover blow off once. had trusses raise off the wall, but never had any collapse what so ever. what I did was thread ropes down through the walls to an anchor in the ground in equal parts of the wall. And put a rope around the top through the trusses to keep them from pulling out of the roof ring. this also keeps the roof from inverting due to weight. My little test taught me a lot about ways of doing things. just my two cents worth.
 
Last edited:
Back
Top