Yurt Forum - A Yurt Community About Yurts  

Go Back   Yurt Forum - A Yurt Community About Yurts > Yurt Living
Search Forums
Advanced Search

Greetings From New Zealand

Reply
 
Thread Tools Display Modes
Old 09-07-2019, 07:52 PM   #1
Yurt Forum Youngin
 
Highlander's Avatar
 
Join Date: Jul 2018
Location: New Zealand
Posts: 6
Default Greetings from New Zealand

Hello everyone,

A wee while lurker here, decided to finally join the community. I guess introductions are in order.
Wife and I decided to get a yurt due to increasingly high real estate prices in NZ, but also because living in nature appealed to us, and we like the idea of our three little children growing up organic, olden style.

We went with

Pacific Yurts

in August last year, 30 foot diameter, 2 doors, 8 windows, tinted

dome

, snow & wind kit, perimeter blocking and water catchment add-on to the top cover.
It is absolutely gorgeous, beautiful material, especially timber, it even smells so nice.

I can't remember anymore why we didn't go with their platform plans, but anyway, this one here suited our situation best:
https://www.shelterdesigns.net/images/platforms/30.jpg

It's a (very) long ongoing project, with a large front and small rear deck, gravel pathway and garden all around, currently existing only in our thoughts

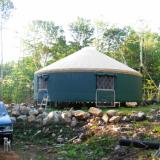
Here's a few photos from building days and when it was finally put up.

Ground screws saved us a ton of hassle with concrete.


Platform turned out okay, we went with ply floor. It did get rained on though, that was poos, we had to puncture

moisture

barrier to drain rainwater.


Yurt building was a scary, thrilling affair. Only one person in the crew knew anything about them, and even that was from years past memory.


Yurt completed. Afraid it's going to be a while before we are ready for a postcard style 'finished' finished yurt photos.


Fire purchase and installation was last minute, with winter around the corner. It's a Nectre 15 freestanding model, marketed sufficient for up to 140m2.


Scariest cut ever, wife had to step in


I made brackets holding the chimney out of folded flue cuttings and scrap pieces of wood, held together by metal screws. I screwed them from inside the outer flue pipe to the folded flue cutting. It was such a rush, ideally I'd like to replace those with bolts, but we had some pretty insane winds lately, and it held out fine.
The main posts go 1m underground with 2 bags of ready-mix concrete to hold it.

The outside elbow partially rests on another piece of flue cutting, which can be pushed aside to reach the cap for cleaning.
I also had to shorten the outside flashing, as it was too close to the window zipper. I used roof silicone sealant between flashing and side cover, leaving top and bottom partially unsealed, so any trapped

moisture

can get out.
Climbing all the way up to put the chimney cap was super scary, but also rewarding it's finally done.


Hearth is made out of cement board, fire bricks (white) and pavers (black). I used heat resistant glue to hold it together.
What really surprised us is how dry it suddenly was inside the yurt with the fire going, on top of being toasty. No mould up to this point, touch wood.


Not directly yurt related, but we recently made this cooking stove section with thin ply to protect yurt covers and guide steam to the

dome

, warm LED light and spice rack.


I have some doubts and questions though, as certain things are still unclear to me, and the yurt manual doesn't go into many details.

For example, the lattice wall brackets which connect to the door frame via nuts and bolts are nowhere near to resting flush to the door frame, and the lattice wall comes inside the door frame, instead of next to it.
I have doubts whether we installed this properly...

When we had really strong winds recently, nuts and bolts loosened and sleeve holding the side cover slipped out of the door frame socket.
We've put it back and tightened the bolts, but since it's not resting flush, I'm worried about tightening it too much. The washers are on an awkward angle.

Anyone have any thoughts on this?


And the water catchment system seems to be working alright, except at one point where it just sags inexplicably. I've tried tightening the whole circumference of the cord going around inside the water catchment sleeve, and I've tightened and tied a knot where the cut out is near the sag. Nothing seems to help.

The issue is, due to sagging, water just flows out where the cut out is, instead of going past the door frame towards one of down spouts.

I can't find any photos online of this system, so I don't have anything to compare it against. Hoping someone here will have ideas on how to fix this.

I was thinking about gluing another piece of fabric with grommets, and essentially make up a third adjustment lacing spot right above the sag, but it's a bit of a mission, was hoping there's a simpler solution.

I guess another thing I could try is put 1/2inch PVC pipe through the hem, around entire circumference, as manual suggests, but I'm not enough math savvy to envision if that would help with my sagging issue.


That's it for now, looking forward to getting more involved with this lovely community.

P.S.
We're completely off grid, solar powered, composting toilet, with separate gray and drinking water catchment systems.

Highlander is offline   Reply With Quote
Old 09-11-2019, 08:25 AM   #2
Administrator
 
Jafo's Avatar
 
Join Date: Jan 2012
Posts: 2,391
Default Re: Greetings from New Zealand

Good post. I would love to hear how the water catchment works out. Some reps at

Pacific Yurts

do stop in here and may be able to add something about the sagging you are seeing in the catchment system. I have a 30' PY too, but due to our snow levels, no catchment system.
Highlander likes this.
Jafo is offline   Reply With Quote
Pacific Yurts - The original modern yurt
Old 09-11-2019, 11:48 AM   #3
Yurt Forum Youngin
 
Highlander's Avatar
 
Join Date: Jul 2018
Location: New Zealand
Posts: 6
Default Re: Greetings from New Zealand

Thanks Jafo! Nice to see a fellow 30'er

I'm curious how your wall connects to the door frame, is lattice resting on side of the door frame, or does it comes inside a bit like mine?
Highlander is offline   Reply With Quote
Old 09-11-2019, 04:11 PM   #4
Administrator
 
Jafo's Avatar
 
Join Date: Jan 2012
Posts: 2,391
Default Re: Greetings from New Zealand

That looks right, though I put the cover piece over it so I haven't really seen that connection in a long time. You do have that piece that slides over that right? It connects to those metal stud pieces you see there.
Jafo is offline   Reply With Quote
Old 09-11-2019, 09:57 PM   #5
Yurt Forum Youngin
 
Highlander's Avatar
 
Join Date: Jul 2018
Location: New Zealand
Posts: 6
Default Re: Greetings from New Zealand

Yep, sure do. I took them out before taking photos.
My impression is that the metal plates aren't long enough to rest flush with lattice wall on one side of L shape and door frame on the other side of L shape.

I'm considering to get longer plates made in a local workshop, so that nuts and bolts can be tightened all the way without bending washers and plates.
Or rather than L shape get them made in Z shape.
Highlander is offline   Reply With Quote
Old 09-12-2019, 11:49 AM   #6
Manufacturer Representative
Pacific Yurts
 
Join Date: Jul 2012
Location: Cottage Grove, Oregon
Posts: 157
Default Re: Greetings from New Zealand

Hello Highlander! The 'elbows' on the ends of the lattice wall should be outside the door frame. This is typically done when you are adjusting the height of the lattice wall at the beginning of the assembly process, but you should be able to shift it over. You may need to unclamp the side cover from the door frame and remove a few screws from the bottom of the side cover on either side of the door to expose where the nearest rafter supports are screwed to the lattice wall. Once the screws holding the lattice wall to the rafter supports have been removed you should be able to get the lattice wall to shift enough to get it off of the door frame. This will allow the metal plates to sit flat against the door frame upright (and allow the side cover to get securely clamped into place).

Adding 1/2" PVC pipe into the hem of the water catchment makes the rim rigid and it will stand upright more easily. It appears that you may be missing some of the 4" diameter spacers, which help the water catchment function as well. However, if you were to put corrugated perforated pipe into the water catchment, it will hold its shape much more easily. Here is an example of the type of pipe that could be purchased locally: .

It may be easier for us to provide photos and detailed guidance via email rather than trying to post here, so you are welcome to email us directly at [email protected].
Highlander likes this.
Pacific Yurts is offline   Reply With Quote
Old 09-12-2019, 12:31 PM   #7
Yurt Forum Youngin
 
Join Date: Sep 2019
Location: lyle, wa
Posts: 19
Default Re: Greetings from New Zealand

Really nice work Highlander. I like your 'steam guide' above the stove. Also I have never seen those 'screw' footings before. Looks a lot easier than concrete. Will there be any problem with settling?


We are also in a 30 footer. Ours is fully insulated top, sides, and bottom and we finished with drywall. (my profile should have a link to our yurt blog if you are interested). We also enclosed the underneath with sheet metal to help make the structure more fire proof and to modulate temperature.


Wait, I'm confused though. Winter is 'around the corner' for us, not for you? Or were these pix from last year? How was your first winter?
pablo is offline   Reply With Quote
Old 09-12-2019, 05:50 PM   #8
Yurt Forum Youngin
 
Highlander's Avatar
 
Join Date: Jul 2018
Location: New Zealand
Posts: 6
Default Re: Greetings from New Zealand

Thanks Pacific Yurts! That explains things a bit, I've emailed you for further details.

Hi Pablo, the ground screws worked out great, contractor came in their Land Rover equipped with a generator, so screwing them in took no time at all. They are rated for light construction and if memory serves have about 2 tonnes wind resistance rating.
I haven't noticed any issues so far.
You can find more information here: https://stopdigging.co.nz/

Here in NZ seasons are reversed from the Northern hemisphere, so our winter is just about to expire or already has. Yurt can definitely be made toasty and warm, I'm most pleased with how it turned out.
We don't get snow, but lots of rain and humidity. If you want to know how much rain, watch Hard Rain with Christian Slater
Jokes, but yeah, lots.
And humidity makes the cold cling to the skin, creeps under the clothes. So the effect seems colder than a dry, snowy climate.

I'll check out your photos for sure, thanks!
Highlander is offline   Reply With Quote
Old 09-12-2019, 07:00 PM   #9
Yurt Forum Addict
 
Join Date: Nov 2013
Posts: 2,156
Default Re: Greetings from New Zealand

Off yurts. NZ is known for raising sheep. Do you wear alot of wool clothes? Or fleece?
Bob Rowlands is offline   Reply With Quote
Old 09-16-2019, 04:48 AM   #10
Yurt Forum Youngin
 
Highlander's Avatar
 
Join Date: Jul 2018
Location: New Zealand
Posts: 6
Default Re: Greetings from New Zealand

Hi Bob! I can't say that I do, but there are expensive sheepskins in souvenir shops.

If you'd like to learn more about NZ, here's a good start:
https://thespinoff.co.nz/media/18-06...he-internet-2/

and


Highlander is offline   Reply With Quote
Reply

Tags
pacific yurts

Thread Tools
Display Modes

Posting Rules
You may not post new threads
You may not post replies
You may not post attachments
You may not edit your posts

BB code is On
Smilies are On
[IMG] code is On
HTML code is Off
Trackbacks are Off
Pingbacks are Off
Refbacks are Off


All times are GMT -5. The time now is 12:51 PM.


Yurt Forum | Buying a Yurt | Building a Yurt | Yurt Life | Yurts for Sale | Yurt Glamping | Yurts Pricing Yurt Calculators | Yurt Insurance | Yurt Insulation | Yurt Classifieds

Copyright 2012 - 2024 Jeff Capron Inc.

Yurt Posts Delivered to your Email!

Stay up-to-date with all the new yurt posts to your inbox!

unsusbcribe at anytime with one click

Close [X]