Ad

Platform framing

elewis33

New member
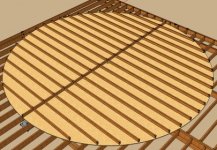
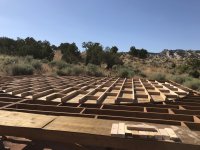
I'm getting ready to do the framing for the circular part of my platform. I have a 30'x32' deck and putting the circular platform on top of the deck. See attached image.

So far all I have is a basic framing layout for the 2"x4" part of the platform. I plan to fill in with blocking every 3-4 feet to add structural support for the next layer of OSB, strategically placed on the seams. I'm using tongue/groove OSB for the sub-floor.

My question is: do any of you have tips for how to block the ends (outside edges of the circle) of the framing, so you get the most support and don't end up having to cut tons of crazy angles? Or do you just bite the bullet and cut angles on both ends of the blocking and get them as close to the edge as possible?
 

Attachments

  • Screen Shot 2019-08-08 at 7.12.58 PM.jpg
    Screen Shot 2019-08-08 at 7.12.58 PM.jpg
    77.4 KB · Views: 740
2x4s huh? That's good. Why? You can easily cut this blocking on edge in two passes with your full size Skilsaw. Cut one edge transfer marks and then finish the cut on the other edge. You can't do that with 2x6 only 2x4 so you are making this easy, and easy is always good.

The easy way to do this oddball angle blocking is to mark in place and cut in place. I always block the guard up on my saw for the steep angles past about 25 degrees, but do so at your own risk. So I block up the guard and set the blade to full depth at standard 90 degree cut. You are using 2x4 and two full 2" deep cuts makes it through a 3.5" 2x4. COOL!

Lay the 2x4 'joist stock drops' on edge on top of the 2x4 frame in the - exact position- where you want it. Reach under the block and mark the cut using the edge of the framing as the guide for your stubby pencil. Flip the blocking over so you can see your marks facing up. Make the cut with the shoe of the saw resting on the edge, -not the face-. On the edge. Cut your mark. Note that if you wield the saw right handed do the right cut then the left.


Flip the cut side down. Grab stubby and transfer the sawcut. Mark the top edge. I just do it bt eye no squares are needed for any of this short 2x4 work. Finish cutting the block. Voila you are done.

If theres no deck underneath to lay the block in its bay, just mark the block 1, 2, 3 and the joists it goes in 1, 2, 3 etc. as you are transfering the saw cut marks and the pencil is in your hand.

The easy way is generally where there's no head scratching, fiddly farting around with squares, protractors, math and so on. Remember it's blocking not trim work. Most importantly, enjoy your work.
 
Note that with blocks on edge around the perimeter you won't have the curve you need for attaching the typical edge band of plywood around the bottom of the yurt wall. You WILL have a place to nail that plywood once the upper layer of osb is in place and cutr to yurt diameter like the lower piece.

Also, most importantly, gap your deck boards. Make CERTAIN there is drainage around the yurt platform perimeter especially if you use OSB for platform. OSB is good sheathing but it 100% SUKS BIG TIME when it gets wet. It turns to mush with repeated soakings. Myself I sheath with it but I'd use exterior rated T&G plywood for the base and the subfloor.
 
Also, most importantly, gap your deck boards. Make CERTAIN there is drainage around the yurt platform perimeter especially if you use OSB for platform. OSB is good sheathing but it 100% SUKS BIG TIME when it gets wet. It turns to mush with repeated soakings. Myself I sheath with it but I'd use exterior rated T&G plywood for the base and the subfloor.


Thanks for the comments Bob, on the blocking and the spacing/drainage. I plan to gap the deck boards themselves (between each other) and also have a 1/2" or 3/4" gap between the decking and the outside perimeter of the raised platform, specifically for drainage. Hopefully that will minimize the problem of the lower layer of OSB from getting destroyed by water.
 
Oh, one more detail I forgot to mention. I do plan to angle the ends of the 2x4 framing, to match the curve of the platform as much as possible. This is where I plan to do most of the attachments of the "bender board" around the platform. Obviously it won't be placed optimally for all the screws but it should only be a problem where the framing comes off the ends of the center support.
 
Well you certainly can butt the outside 2x onto the ends of the beveled joists if you want. I think that is unnecessary work getting in there with a sawzall and finishing out the joist cut down to the osb, but go for it if you want. In effect butting instead of blocking means you'll have a break joint at each joist. I fit blocks between because blocks stops joists from 'rolling' better than end nailing. Of course in the case of 2x4 on edge in your design it reallydoesn't make a lick of difference in terms of strength due to the short height and the extremely low loading. Have fun while you work. Cheers.
 
Well you certainly can butt the outside 2x onto the ends of the beveled joists if you want. I think that is unnecessary work getting in there with a sawzall and finishing out the joist cut down to the osb, but go for it if you want. In effect butting instead of blocking means you'll have a break joint at each joist. I fit blocks between because blocks stops joists from 'rolling' better than end nailing. Of course in the case of 2x4 on edge in your design it reallydoesn't make a lick of difference in terms of strength due to the short height and the extremely low loading. Have fun while you work. Cheers.


A couple photos from this weekends work session. Finished out the OSB underlayment and the 2x4 framing on top, with most of the blocking in place. Any thoughts, comments, recommendations?
 

Attachments

  • IMG_8164.jpg
    IMG_8164.jpg
    3.4 MB · Views: 701
  • IMG_8163.jpg
    IMG_8163.jpg
    1.7 MB · Views: 1,944
West and north a ways, Vernal, UT. Thanks for the complement, I appreciate that coming from a skilled tradesman. It's getting close to ready to get that yurt pitched. It's starting to feel real. Hopefully we'll get it done over Labor Day weekend.
 
Last edited:
The front range of CO south of here and down on into New Mexico looks exactly the same. Same rocks, same plants, same aridity. Perfect country for yurts. Enjoy the rest of your build. Thanks for putting this on the forum for others to see too, btw.
 
Insulation (styrofoam) between the 2x4's?

Can't you just attach 1/4 plywood parimeter to the 2x4's with some longer screws?

Chris
 
Last edited:
If sure if I lived there full time I'd insulate the floor with 2" foam board from Depot, Lowes local hardware, or wherever your insulation board of choice could be bought for the lowest cost. My floor is uninsulated and lemme tell yuh if I lived in there it WOULD be. As for perimeter plywood that's the standard procedure to keep the yurt on the platform, and for wall covering anchorage.
 
I used to insulate insulated trailer skirts in nw Wyoming. That made a !!HUGE!! difference in the floor staying warm and keeping the plumbing from freezing when it got seriously cold.
 
Insulation (styrofoam) between the 2x4's?

Can't you just attach 1/4 plywood parimeter to the 2x4's with some longer screws?

Chris
Chris,


Yes and yes. We were just trying to sort out how it would work on some of the points at the ends of the center board. But we sorted it out with some perpendicular supports coming off the main joists.
 
Back
Top