
You are using an out of date browser. It may not display this or other websites correctly.
You should upgrade or use an alternative browser.
You should upgrade or use an alternative browser.
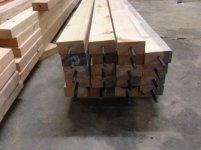
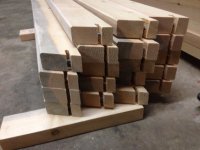
Building my first yurt
- Thread starter ryankal
- Start date
I think if you go through the roof ring, it will be the most cost effective. Just make sure you have 18" on either side of the yurt and you should be good. You can always go through the wall later when more funds are available, and you will be able to re-use the pipe.
Disclaimer: I am no expert on installing stoves, but that seems to make sense to me.
Disclaimer: I am no expert on installing stoves, but that seems to make sense to me.
Bob Rowlands
New member
I centered my stove pipe in the roof ring with tie wire. There's no way that pipe will ever shift.
As for the China cap, I got a ~3'x4' sheet of flashing at Home Depot for $5. It's in the aisle with the vent pipe. *Note: vent pipe 'IS NOT' stove pipe!* Mark a 5" d circle in the center with a Sharpie. Cut a slit to the center, and cut out the circle. This is a real trip with straight cut snips, lemme tell ya.
Overlap the edges until you form a cone. Eye ball the cone shape while eyeballing the roof pitch. Temporarily tape both edge seams. Cut a circle around the base of the China cap, about 10" bigger than the yurts smoke hole diameter. Keep the 5" hole in the middle when you lay out the circle. This is also a trip. Laying the cap on a flat surface helps mark where to cut. It's all by eye. Remember to start big cause it'll shrink in dia. as you refine the circle.
Set a ladder under the smoke hole and shove that sucker up through the roof ring and center it over the hole. You have to bend it to get it through the hole. Go out and eyeball the angle. Adjust as necessary. Make witness marks when finished.
To secure the conic shape I used 8-32 x 1/2" round head nuts and bolts along the two overlapped seams. I used four bolts on each seam. Do NOT put tinners metallic tape on the seams. The adhesive will stink up the yurt when it gets hot. Guess how I learned that one. lol
You want the cap to slide over the stove pipe so remark the -now ovalized- 5" hole some 1" larger in dia. than you double wall stove pipe size. Try the pipe for fit. You want the hole bigger, and round. Have more fun with those straight snips.
To finish the outside edge of the cap, snip tabs all around the outside edge. Make your cuts about 1" apart. Bend the tabs UP, towards the sky, not down. Pound them flat. China cap is now basically done.
I tie wired my cap to the stove pipe guy wires. Drill a pair of 1/8th holes about an inch apart in the cap. Two pair 180 degrees opposite eachother, with the stove pipe hole in the center. Loop tie wire up through a hole and back down through an adjacent hole. Secure in place to the pipe tie wires of whatever. It won't flap up and down in winter wind.
In the summer the tie wire is off. I jamb it up on an angle to the stove pipe with a stick so the breeze flows out. If it gets windy and rainy I bop it with the stick, and let it flop down flat. Cheap. Ugly. Safe. Works great.
Have fun.
Thanks for the tips Bob! I found a cone shaped flashing that I may be able to attach to a larger sheet of flashing (my roof ring is 36in in diameter), which would work nicely without the need for excessive trimming with snips (which I abhor).
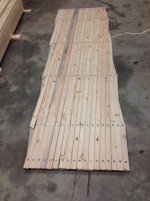
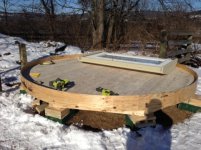
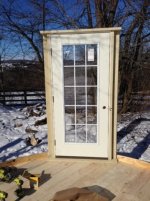
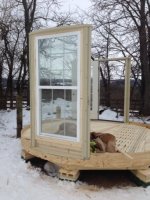
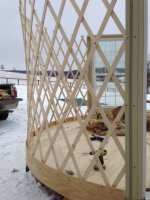
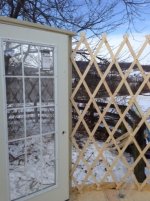
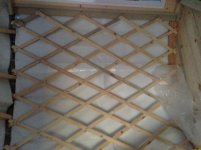
I assembled a khana wall today. What a relief that all the work I have performed up until now will actually work. I was so worried that I wasn't accurate enough in my drilling and cutting that the khana wouldn't line up correctly. But it all worked out. Tomorrow I plan on assembling the other wall, framing my door in the door frame, and framing my window. Hopefully will start putting it up on Thursday!
Ryan
Attachments
Bob Rowlands
New member
VERY nice deck. Well done!
Marshall Eppley
New member
Ryan are close to Berkeley Springs WV. Western Md is just across the bridge and up the road a piece
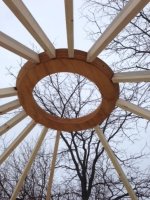
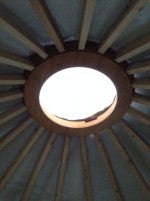
I figured my stove/chimney pipe out. I purchased some Selkirk chimney pipe from Lowes as they had the best price I could find. I am going to run single wall pipe from the stove to the chimney. I will secure it with wire, or a clamp. For my lid, I am either going to get a galvanized trash can lid or bucket and cut a hole in the middle. I will likely have to go with a bigger bucket as I can find any trash can lids large enough to span the hole in my roof ring.
It feels nice to finally get this squared away...
Thanks for all the ideas!!
Ryan
It feels nice to finally get this squared away...
Thanks for all the ideas!!
Ryan
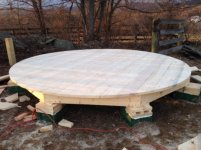
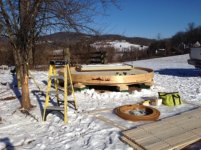
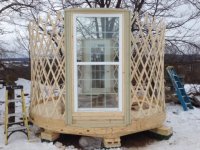
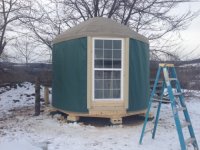
I got A LOT completed over the weekend. I went from a bare platform to a nearly finished yurt. I just need to finish attaching the canvas walls and then fine tune everything.
Thanks for all the help!! It has been a journey.
Ryan
Thanks for all the help!! It has been a journey.
Ryan
Attachments
Ohh, I forgot to ask. How do I know if the wall cable is tight enough? I was able to sit on the roof ring, and its level.
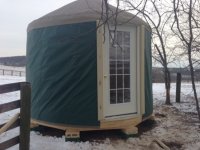
More photos as well.
Ryan
More photos as well.
Ryan
Attachments
Bob Rowlands
New member
Good job Ryan.
Marshall Eppley
New member
You did a great job Ryan.
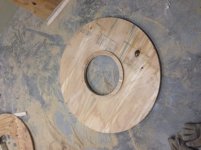
Tomorrow I plan to install the stove. I ended up making a roof cover from plywood which I will cover with some copper flashing which I found for $10. I also need to do some punch out work and clean the floor. Im hoping to sleep in it tomorrow night!
Thanks again for all the info!
Ryan
Thanks again for all the info!
Ryan
Attachments
Bob Rowlands
New member
dynamite man. Looks G-R-E-A-T!!