Building a steam bending box is pretty easy, actually. I have only done it once but it is pretty quick as well. Enough for a tono shouldn't be too hard, as long as it will fit inside a 4" pipe. My mentor had done the same thing, but built the steam chamber out of 2 - 1"x6" and 2 - 1"x8" used to form the steam chamber.
Heat control is the only tricky part, if there is any tricky part. You will need a camp stove or a electric hot plate, I have even heard of it done with an iron as the heat source.
Get a piece of 4" plastic pipe longer than your wooden pieces and 2 - 4" glue on and screw on fittings with the screw on end caps.
I also bought some 1/2" pipe and a 1/2" junction and a 45 degree angle and the connector to screw 1/2" copper to 1/2" plastic pipe, and about a foot of 1/2" copper pipe.
Almost finished with the parts list, the last part is a NEW one gallon can that had a nipple in the cap and a piece of flexible plastic pipe on that nipple to help you pour more easily. I don't remember the size, but I remember that I had to buy some adaptive fittings to get the 1/2" copper small enough to fit the nipple on the gas can lid.
Drill a hole in one of the screw in end caps, very close to the edge of the cap so that you can glue in a piece of the 1/2" pipe. You don't want it to extend inside much at all, close to flush with the inside of the pipe cap. It doesn't have to be very sturdy if you are careful with it.
In the other end cap drill a 1/16" hole. Glue the end cap female parts on the ends of the pipe. When the glue is dry you can screw in the end cap, just finger tight. In the other end you can do the same, just to be sure they screw in easily.
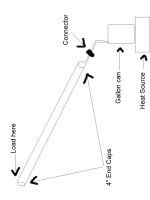
I hung the pipe with a rope from a garage rafter, not too high. I used the high end to load the steamer. The angle should be about 45 degrees, and the 1/2" pipe should be on the bottom, so the condensate can run out the pipe. I glued a junction on the end of the 1/2" pipe, and on the other end of the junction the plastic to metal adapter, and then soldered the necessary adapters to get from the nipple on the cap to the 1/2" copper.
Fill the gas can 3/4 full of water, set it on the heat source, screw the lid on the gas can and adjust it so that the low end of the 4" pipe with 45 angle and connector etc. lines up so the steam from the water is directed up the 1/2" pipe and into the 4" pipe.
Screw the end cap out of the upper end of the pipe and load your wood into the pipe and turn on the heat. When you begin to see just a little steam coming out of the upper end of the pipe, screw on the upper cap with the 1/16" hole. You don't want to build a pressure cooker, just a steamer, so make sure the to build up, so make sure the hole stays clear.
A little steam should come out of the upper hole, but you don't want much to escape, so adjust the heat until just a little comes out. In theory the steam will condense in the upper end and run back down the pipe and back into the gallon can.
In my case I ran the wood in the steamer for about 2 hours, put on some heavy leather gloves and reversed the wood, and cooked it for another 1 1/2 hours. When it came out it was very flexible. I was a little nervous about the can running out of water, so I poured some boiling water down the pipe and let it put more into the boiling can. I don't remember if it was really necessary or not, it has been many years. I do remember I could have an idea of how full it was by the sound of the water trickling into the can.
Remember to get the proper alignment on the lower pipe. You want it to let any condensation to get back into your supply of water so it won't just run dry and burn your gallon can to the burner.
I was bending 3/8" x 1 7/8" ash to use in a stick and canvas kayak that I never managed to finish before I moved away. It turned out to be heavier than I was hoping for.
I think I still have the can and connections sitting somewhere in my storage, but I gave the 4" pipe away long ago. It was too awkward to store.
I'm not sure if my description is clear, but I hope my poor drawing will help, if I can figure out how to upload it.
I'm not sure how the wet wood would effect the glue. You might have to tie it in place until it cooled and dried again before you glued it.
Type to you later,
Rod
rod::email::yurtlocker.com
Home Page.